

 August 3, 2026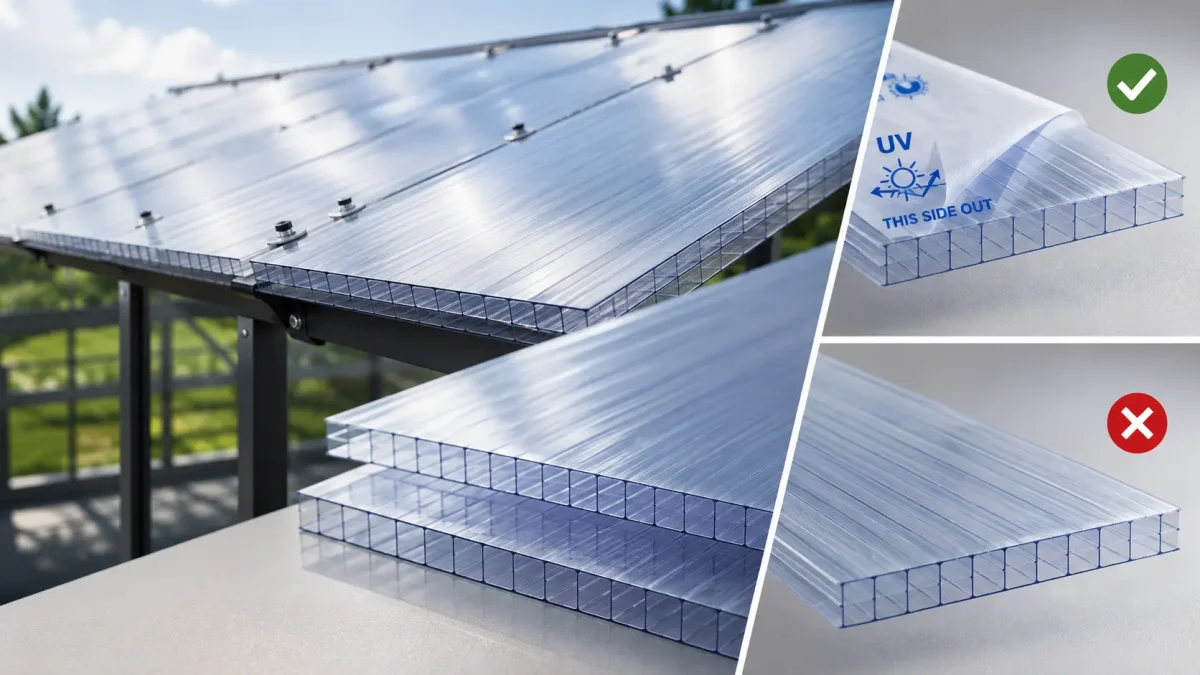
Polycarbonate is one of the most popular materials for building greenhouses, patio canopies, carports, and roof skylights. It is lightweight, durable, and transmits light well — but only when installed correctly. One of the most serious installation errors is laying the sheet with the wrong side facing the sun. This mistake can cause the material to start yellowing, turning opaque, cracking, and losing its properties within just 2–3 years.
Find out which side of polycarbonate should face outwards, how to identify the UV-protected layer, and how to carry out installation step by step so that the sheets retain their durability, appearance, and resistance to sunlight for many years to come.
Polycarbonate — which side should face outwards?
Polycarbonate is not inherently resistant to UV radiation. If a sheet is exposed to direct sunlight without adequate protection, the material gradually begins to lose its properties. Over time it becomes less resilient, turns opaque, yellows, and its structure undergoes irreversible degradation. To prevent this, one side of the sheet is coated during manufacturing with a thin, transparent UV-filter protective layer.
In most cases, the UV protection is applied to one side of the sheet only. This is primarily due to production costs — applying such a coating is expensive, so standard sheets are protected on one side only. The exception is special dual-sided variants, labelled as 2xUV, which are used where solar radiation acts on the material from both sides.
The most important installation rule is straightforward: the side with the UV filter must always face outwards — towards the sun.
The difficulty is that once the protective film is removed, both sides of the sheet look identical. The difference cannot be detected with the naked eye, even upon close inspection. This is why the sheet’s orientation must be checked before installation, using the markings on the protective film. Skipping this step is one of the most common causes of installation errors. Fitting the sheet with the wrong side facing the sun can result in its deterioration within just a few seasons and necessitate a costly replacement of the entire covering.
How to identify the UV-filter side
The problem is more serious than it might appear. It is estimated that as many as 15–25% of polycarbonate sheets are installed the wrong way round, and there are structures where virtually the entire covering has been fitted incorrectly. The reason is usually the same: once the protective film is removed, both sides of the sheet look identical, so the installer relies on memory, habit, or instinct.
Manufacturers have anticipated this risk and use several methods of marking sheets that allow the UV-filter side to be identified reliably before work begins. The protective film remains the most important indicator, but laser markings and simple identification methods — used when the film has been removed prematurely — can also be helpful.
Protective film — the simplest way to identify the UV side
Every polycarbonate sheet is factory-protected with a film on both sides. It is precisely the markings on this film that offer the easiest and most reliable way to identify which side of the sheet should face outwards.
The principle is straightforward:
- Film with printed markings — featuring the manufacturer’s logo, brand name, technical information, or directional arrows — indicates the outer side, i.e. the side that should face the sun.
- Plain, uniform film with no text indicates the inner side, which should face the interior of the structure.
The film should not be removed too early. Before installation, it is sufficient to fold it back only at the sheet’s edges — approximately 10–15 cm — to allow profiles, seals, and finishing elements to be fitted freely. The printed film acts as a clear UV-side indicator throughout the installation process, so it is best removed only once the work is complete.
Laser markings and the sun symbol
In addition to printed markings on the film, manufacturers often apply supplementary markings directly onto the sheet’s surface. The side protected by the UV filter may bear permanent laser markings. These are discreet but are usually visible at the correct angle of light, even after the protective film has been fully removed. This is particularly useful when a sheet is being re-installed or when only a single section of covering is being replaced after several years.
The outer side’s film frequently also features a sun symbol with rays pointing towards the sheet. Its meaning is unambiguous: this side should face the sun. Some manufacturers also include a crossed-out foot symbol, indicating that this side should not be walked on during roof installation.
What to do when the film has already been removed
It sometimes happens that the protective film peels off during transport, is removed when cutting the sheets, or disappears before the markings have been checked. In such a situation, it may still be possible to determine which side of the sheet has the UV filter.
The following methods can help:
- UV tester — hold a UV pen, UV indicator, or UV lamp against both sides of the sheet. The side with the filter will limit the transmission of radiation, whilst the unprotected side will allow UV through and the indicator will react accordingly.
- Laser markings — hold the sheet at an oblique angle to the light and inspect its surface carefully. Subtle laser-engraved text, symbols, or the manufacturer’s logo may be visible on the UV-filter side.
- Wall thickness — in multiwall polycarbonate sheets, the outer wall with the UV layer is typically thicker than the inner wall. The difference can be measured with callipers on a cross-section of the sheet’s edge.
- Marker labelling — if you are removing sheets that have already been installed, mark the outer side immediately with a permanent marker. This ensures you do not lose track of orientation when re-installing them.
If none of these methods provides sufficient certainty, it is best to contact the supplier or manufacturer. Using the batch number from the label or packaging, it is usually possible to establish the correct orientation for a specific production run.
Type of polycarbonate and UV protection method
.jpg)
Polycarbonate sheets can differ not only in thickness, structure, and intended application, but also in their method of UV protection. Depending on the type of material, the filter may be applied to one side, both sides, or via a different manufacturing process.
This has considerable implications for installation. The type of protection determines whether particular care must be taken to orient the sheet correctly relative to the sun, and whether the material can be used in locations exposed to radiation from both sides. It is therefore worth checking which type of polycarbonate has been selected and what markings the manufacturer uses for a given sheet before work begins.
Multiwall polycarbonate
Multiwall polycarbonate is the most commonly chosen type of sheet for greenhouses, patio canopies, carports, and covered parking structures. In standard sheets, the UV-protective layer is applied to one side only — usually the side marked by the printed protective film.
The sheet’s construction is also asymmetric. The outer side, protected by the UV filter, typically has a thicker and more resilient wall, whilst the inner side is thinner and lacks this protection. For this reason, correct orientation relative to the sun is particularly important with multiwall polycarbonate. This is precisely where installation errors are most likely to occur and can significantly reduce the lifespan of the entire covering.
In locations where solar radiation may act on the sheet from both sides, special 2xUV versions are used. These are more expensive than standard sheets but are protected on both sides, making them suitable for vertical glazing, screens, pergolas with gaps, and similar structures.
Solid polycarbonate
Solid polycarbonate has a different structure from multiwall sheets, and in many cases its UV protection is also handled differently. In higher-quality products, protection is often applied to both sides of the sheet, significantly reducing the risk of incorrect installation.
This is a considerable advantage in structures where sunlight may fall on the material from various directions, or where it is difficult to determine in advance which surface will be more exposed to UV. This applies to, amongst other things, partitions, screens, vertical glazing, and elements exposed to reflected light.
This does not mean, however, that every solid sheet has dual-sided protection. In lower-cost variants, the UV filter may be applied to one side only. It is therefore essential to check the product’s technical data sheet and the markings on the protective film before purchasing and installing. This is the simplest way to avoid fitting the sheet incorrectly and the problems with durability that follow.
How to install polycarbonate correctly

Even a high-quality sheet with a well-applied UV coating can quickly lose its properties if installed incorrectly. The UV-filter side alone is not sufficient — the fastening technique, channel direction, appropriate expansion gaps, and edge protection are equally important.
Over-tightened screws, insufficient allowance for thermal expansion, horizontally oriented channels, or unsealed sheet edges can all lead to cracking, moisture ingress, distortion, and accelerated material degradation.
It is therefore worth approaching installation as a whole process, rather than simply screwing sheets to a structure. Below we describe the four most important stages: correctly positioning the UV side, maintaining expansion gaps, proper fastening, and protecting edges against water, dust, and insects.
Stage 1: Align channels with the direction of drainage
In multiwall sheets, the internal channels do not serve solely to reinforce the material. They are also designed to drain condensation and moisture that may accumulate inside the chambers. Sheets must therefore be laid so that the channels run in the direction of water flow — vertically on walls and in line with the slope on roof surfaces.
If the channels are positioned horizontally, water will have no free outlet. Moisture will begin to accumulate inside the sheet, and over time algae, mould, and dark discolouration may develop. Such contamination cannot be removed by ordinary cleaning, as it forms within the material’s structure. In practice, this frequently necessitates dismantling or replacing the sheet.
Roofs with a very shallow pitch — below 5° — require particular attention. In such cases, the lower edge of the sheet must be well protected, and the profiles must allow for controlled water drainage. On very flat installations, any error in sealing leads more rapidly to moisture penetrating the chambers.
Stage 2: Allow for material expansion
Polycarbonate responds strongly to temperature changes. Its coefficient of linear expansion is approximately 0.067 mm/m·°C, meaning that a 1-metre sheet can elongate by more than 3 mm with a 50°C temperature difference. With larger formats, the movement is even greater, so the structure must not restrict the material’s natural behaviour.
Three fundamental rules must be observed during installation:
- Holes for screws should be approximately 2–3 mm larger than the fastener’s diameter. Slightly elongated holes are preferable, as the sheet must be able to shift slightly under the influence of temperature.
- Screws should not be over-tightened. The fastener should compress the seal but must not fix the sheet rigidly in place. Over-tightening the fixing points causes stress and cracking in the material.
- The sheet should sit within the profile to a depth of at least 20 mm, but without being wedged. The profile is intended to guide and stabilise the sheet, not clamp it so tightly that it cannot move.
Insufficient expansion allowance is one of the most common causes of polycarbonate damage. Symptoms typically appear after a period of high temperatures: stress builds up at the fixing points, followed by cracks running along the screw lines or at the sheet edges.
Stage 3: Protect edges from water and contamination
The edges of multiwall sheets must not be left open. Dust, moisture, insects, and algae spores most easily penetrate the channels through the edges. If the edges are not properly sealed, the sheet may turn green from the inside over time — and such contamination cannot be removed without dismantling or replacing the material.
The choice of sealing method depends on the position of the edge:
- Upper sheet edge — should be sealed with solid tape, which prevents water and contaminants from entering the chambers.
- Lower sheet edge — should be protected with perforated tape, which guards against dust and insects whilst allowing condensate to drain and the channels to ventilate.
Instead of tape, suitable U-profiles with seals can be used: closed at the upper edge and perforated or open at the lower edge. It is important that the lower part of the sheet is not sealed completely, as condensed moisture must be able to drain freely. Without this protection, permanent discolouration, algae growth, and a deterioration in the appearance of the entire covering will occur rapidly.
Stage 4: Use appropriate fasteners
Ordinary screws with metal washers or fasteners without seals should not be used to install polycarbonate. Direct contact between metal and the sheet can cause micro-cracks, leaks, stress, and localised material damage.
The safest solution is to use thermal washers with EPDM or neoprene seals. This type of fastening not only stabilises the sheet but also seals the fixing point, insulates the material from metal, and partially compensates for the stresses that arise as polycarbonate expands under the influence of temperature.
H-profiles are used to join sheets, and U-profiles to seal edges. These should be made from aluminium or UV-resistant PVC. When using aluminium profiles, EPDM seals must be fitted between the metal and the sheet. Polycarbonate should not come into direct contact with aluminium, as this can damage the edges and weaken the durability of the entire joint.
Common polycarbonate installation errors
Problems with polycarbonate sheets most commonly result not from poor material quality, but from incorrect installation. Cracking, leaks, yellowing, distortion, and green algae within the chambers typically occur when the basic principles of working with this material have been overlooked. It is worth being aware of the most frequent errors, as most of them cannot be rectified without dismantling the sheets.
- Fitting the sheet with the wrong side facing the sun — this is the most damaging installation error. The unprotected side exposed to UV radiation quickly loses its resilience, yellows, turns opaque, and begins to crumble. The first serious damage may appear within just 2–3 seasons.
- Laying channels horizontally — in multiwall polycarbonate, channels should run in the direction of water flow. If positioned horizontally, condensate accumulates inside the sheet, encouraging algae growth, mould, and permanent discolouration.
- Over-tightening screws — polycarbonate must be able to move in response to temperature changes. Rigid fixing prevents the material from expanding and leads to cracks at the holes or along the fixing lines.
- Leaving edges unsealed — unprotected edges of multiwall sheets allow dust, insects, moisture, and algae spores to enter. The result is contamination inside the chambers that cannot be removed by ordinary cleaning.
- Removing the film before work begins — the protective film not only protects the surface from scratches but also indicates the UV-filter side. Removing it too early increases the risk of error and makes it harder to orient the sheet correctly.
- Insufficient clearance in profiles — a sheet fitted too tightly has no room to expand during hot weather. It may then buckle, bow, work loose from its fixings, or crack at the edges.
Most of these errors only become apparent over time, when remediation already means dismantling the structure and replacing the damaged sheets. For this reason, checking the UV side carefully, allowing for thermal expansion, laying channels correctly, and sealing edges are far simpler and less costly than subsequent repairs.
How to maintain polycarbonate to preserve its durability
.jpg)
Correctly installed polycarbonate does not require complex maintenance. Regular removal of dirt and periodic checks of the fixing elements are sufficient to keep the sheets clear, weathertight, and resistant to damage for many years.
- Cleaning the surface — use a soft cloth, sponge, lukewarm water, and a mild detergent. Avoid hard brushes, wire wool, and products containing acetone, benzene, solvents, or strong alkalis. These can scratch the sheet and damage the UV protective layer.
- Cutting and installation at the correct temperature — do not work with sheets in freezing conditions. Below 0°C, polycarbonate becomes more brittle and susceptible to cracking. Work is best carried out at approximately 10–20°C.
- No walking directly on the sheets — polycarbonate is not designed to bear concentrated point loads from feet. If access to the canopy is necessary, use a wide board or walkway to distribute the weight across a greater area and several chambers.
- Cleaning profiles and gutters — accumulated leaves, sand, and standing water at the edges can accelerate wear of the profiles and increase the risk of moisture penetrating the sheets. These areas are worth checking particularly after heavy rainfall and in autumn.
- Checking seals — inspect the condition of EPDM seals at the fixings and profiles at least once a year. If they are hard, cracked, or misshapen, they should be replaced before winter, before water begins to penetrate the weak points.
Every few seasons it is also worth inspecting the sealing tape at the edges of multiwall sheets. If it is peeling away, torn, or dirty, replacing it promptly is advisable. It is a minor task that helps prevent moisture from entering the chambers, algae from developing, and the appearance of the entire covering from deteriorating permanently.
Summary
The durability of polycarbonate depends not only on the quality of the sheet itself, but above all on correct installation. The key principles are straightforward: the UV-protected side must face the sun, channels in multiwall sheets must run in the direction of water flow, screws must not be over-tightened, edges must be sealed, and the protective film is best removed only after all work is complete.
Each of these elements may seem like a minor detail, but in practice it is precisely these details that determine the lifespan of the entire covering. Correctly installed polycarbonate can serve reliably for many years, retaining its clarity, weathertightness, and resistance to the elements. The same material, installed incorrectly, may begin to yellow, crack, or leak within just a few seasons.
The greatest costs typically arise not from purchasing the sheets, but from the need to rectify installation errors. It is therefore worth taking the time before final fixing to check the markings on the film, prepare the correct holes, allow for thermal movement, and seal the edges thoroughly. This brief verification stage can protect the entire structure from premature replacement.